Keine Produkte
Preise inkl. MwSt.
4 Schritte, um eine Größenänderung zu vermeiden
One of my worst memories of my time as a runner in cushioned shoes is the pain in my toes.
When it came to choosing a size, I didn't follow any rules.
If my toes were almost at the tip of the shoe, they were fine. They are my size.
Of course, that's still, without movement, which is how one usually tries on shoes.
But as soon as I started walking or running, things changed, because the foot "grows" to cushion the impact.
Something important that I didn't know before.
We can say that the arch of the foot is flattened.
A little bit.
This happens in a short period of time, and then it returns to its natural position.
But these swings or brief movements of the foot cause the toes collide with the front of the shoe.
This often turns getting black nails and sore toes.
This was even worse, if the way where I run has slopes. (Trick to avoid the movement of the foot inside the shoes).
In the world of runners, this is very normal, it seems that if you do not have a black nail you have never been a runner.
Like the leg of the ham, if you don't have a black hoof it's not the good one.
4 steps not to change the size of your shoes when buying online.
- Measure your foot
- Choose type of setting
- Entering data on the orange button
- Check the size
1.- This step is the most important. Without the size of your foot it is difficult to get it right the first time.
Why?
- Because every brand has its last. Its pattern. And it doesn't usually has relation with any other.
- The established sizes do not correspond from one brand to another. Sometimes even at the same brand the sizes are different. A Vivobarefoot in size 43 measures different than a size 43 in Merrell.
- The size of the foot is a clear and unequivocal reference. It is an objective and very reliable data.
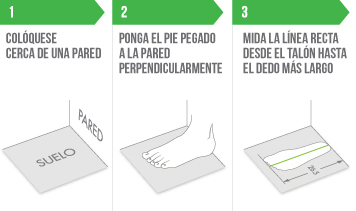
Measuring the foot is very easy, you just have to put your foot (first one and then the other) on a wall and with a pencil point out a line on the longest toe.
2.- How does the shoe fit on your foot?
Before talking about the fit, two quick but extremely important notes.
A. The shoe should not break the linearity of the big toe. Say in another way. It must not end in a point.
If the thumb is pushed inward by the shape of the shoe, the shoe loses its function. Remember that this toe is the engine of the foot. Watch out!
B. We must feel the toes free. With enough space inside the shoes.
This is key to any shoe, and more so, if it why it is labeled as a barefoot shoe.
Of course, in some activities you will be more comfortable with a shoe that fits tightly around the ankle and at other times you will prefer to go looser.
In general, for walking or running on asphalt or city, you don't need to feel the shoe sticking to your foot.
Yes if you are going to run on mountains or uneven terrain.
How do you know what kind of adjustment the shoe offers?
By reading the characteristics or with the videos. Both sections are placed inside the product.

There are shoes with an integrated tongue, others with a classic tongue... and even shoes with a half integrated, half loose or classic tongue. If your foot has a lot of instep or is very wide, you are the one with the classic tongue.
There are also models with a particular fit, like the Merrell Trail Glove. In all its versions, and they go 5 and up. The fit is maximized in the central part of the shoe.
This is achieved with the help of the sole that goes up at the the plantar arch zone.
So the first time you wear the shoe you think it has arch support.
Something unthinkable in a pure minimalist.
You will think they are a sh*t. When you are really looking at the best fit a shoe can offer.
In a couple of days they'll be a glove. As its name.
3.- Sehen Sie sich die Maßtabelle jedes Modells an
Gehen Sie mit der Messung Ihres längsten Fußes auf der Website zu dem Modell, das Ihnen gefällt.
Sobald Sie sich auf der Modellseite befinden, sehen Sie die Schaltfläche „Überprüfen Sie hier Ihre Größe“ unter den Größen oder die orangefarbene Registerkarte „Meine Größe“, die Sie etwas weiter unten sehen. Wenn Sie darauf drücken, wird eine Tabelle mit Messungen angezeigt.
Darin sehen Sie, welche Innenmaße jede Größe in Länge und Breite hat.
Stellen Sie sich vor, dass die Größe, die Sie wählen, der Raum ist, in dem Ihre Füße leben werden.
Auf diese Weise können Sie anhand Ihrer Fußmessung erkennen, ob eine Größe klein, mittelmäßig oder perfekt ausfällt. Damit es perfekt ist, müssen Sie die Größe wählen, bei der Sie zwischen 0,6 und 1,2 cm zusätzlichen Platz haben.
Beispiel: Wenn Ihr Fuß 26 cm misst und Sie zwischen einem Modell in Größe 9 (26,5 cm) und Größe 10 (27 cm) liegen, wählen Sie das größte Modell. In diesem Fall haben Sie bei Größe 10 1 cm mehr Platz.
Wenn Sie Fragen haben, können Sie mich auch per WhatsApp unter 693 714 444 kontaktieren
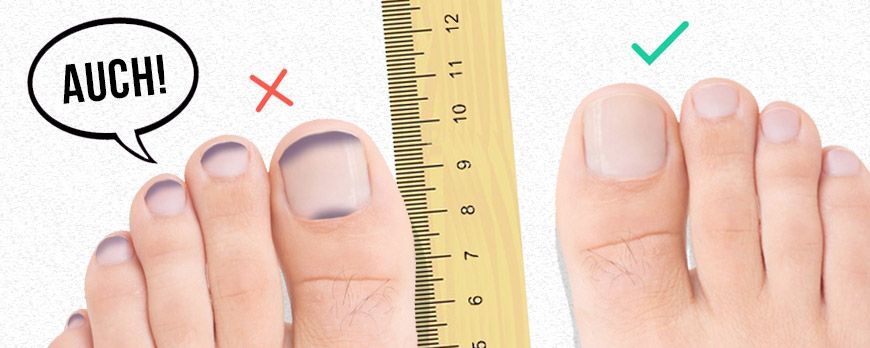
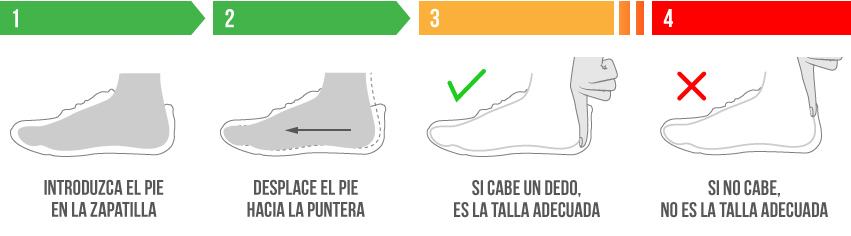
4.- Check if the size is correct
An image to clarify the issue.
As summary:
- Measure your foot
- Choose the type of adjustment according to your preferences or activity to do
- Enter the measurement of your longest foot in the chosen model
- Finally, check the size
There you go.
Now to feel the terrain, to enjoy every step,...
...to jump, run or jump...
...but always the right size.
Dejar un ComentarioDejar una respuesta
Blog categories
- First categroy
- Schuhrezensionen
- Estudios Científicos
- Nike und minimalistische...
- Morton-Neurom
- Ballenzehen
- Die Meinung von Podologen...
- Krallenzehen, gedrängte...
- Plattfüße
- Verletzungen von Läufern,...
- Verstauchte Füße,...
- Schuhe für breite Füße oder...
- Fersen- und Rückenschmerzen
- Kinderfüße und Entwicklung,...
- Durchblutungs- und...
- Knieschmerzen,...
- Plantarfasziitis
Últimos Comentarios

Fernando Capellán
Die Vivobarefoot-Klage… und was dann geschah
Lorena Cortés
Das hat Nike mit Nadals Fuß gemacht
Fernando Capellán
Sie nennen es hässlich ... aber jeder wird es...
Antonio Caballo
Das Fingerarmband: Wenn Mode das Gehirn quetscht